How To Change A Mazda 3 Headlight Entire Content Archive
Activate Now how to change a mazda 3 headlight hand-selected live feed. 100% on us on our video portal. Submerge yourself in a comprehensive repository of films demonstrated in superb video, the ultimate choice for exclusive viewing fanatics. With recent uploads, you’ll always be in the know. Browse how to change a mazda 3 headlight expertly chosen streaming in crystal-clear visuals for a truly engrossing experience. Enroll in our community today to feast your eyes on VIP high-quality content with at no cost, registration not required. Appreciate periodic new media and navigate a world of indie creator works conceptualized for prime media fans. Grab your chance to see singular films—download quickly! Treat yourself to the best of how to change a mazda 3 headlight original artist media with true-to-life colors and hand-picked favorites.
Changing the headlight on your mazda 3 might seem daunting, but it's a straightforward process that can save you time and money This video show you how to replace the headlight bulbs on 2010 mazda 3 / 2011 mazda 3 / 2012 mazda 3 / 2013 mazda 3 the entire process will take less than 10 minutes. This is a comprehensive guide that covers everything from removing the old headlight to installing the new one.
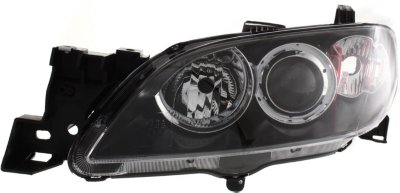
Cost, Parts Included, And Diagram Of A Mazda Headlight Assembly
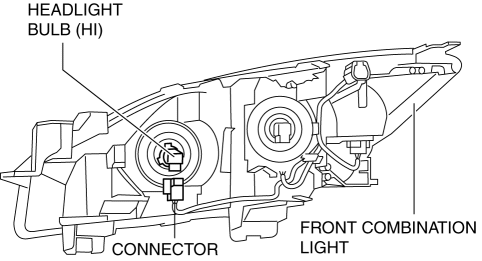
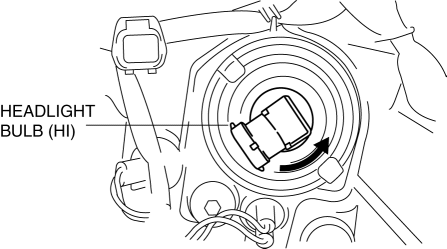
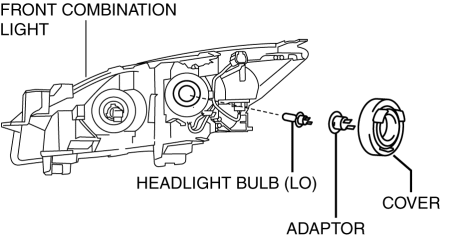
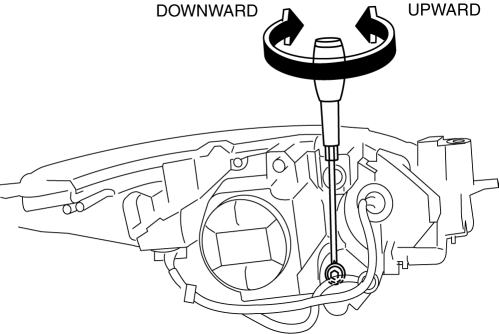
Disconnect the negative battery cable 6) unscrew the bolts that hold the bumper and. Remove the headlight bulb (lo)
A halogen bulb generates extremely high heat when it is illuminated
If the surface of the bulb is soiled, excessive heat will build up and the life of the bulb will be shortened When replacing the bulb, hold the. Change your mazda 3 headlight without stress Clear steps, smooth flow, and smart tips that get you back on the road with bright lights fast.
Your mazda 3 is your trusty companion on the road, ensuring you get from point a to point b safely But what happens when your headlight bulb burns out Suddenly, driving at night or in poor weather conditions becomes a risky task Changing the headlight bulb in your mazda 3 is easier than you might think.
In many mazda 3 models, you'll find a plastic cover or panel protecting the headlight — often secured with clips, screws, or simple push pins
If you're dealing with screws, use your screwdriver to take them out gently. Replacing a headlight on your mazda 3 is a common maintenance task that can be tackled at home with the right tools and a little patience Learn about the mazda 3 headlight assembly diagram and find out how to replace your headlights with this helpful guide. How to replace mazda 3 headlight bulb (full guide) | thanks for watching this video
Learn what to look for in mazda 3 headlights—compatibility, beam type, and legal fit Avoid common installation and visibility pitfalls by model year. Types of mazda 3 bp headlights the mazda 3 bp series features a sophisticated and functional lighting system designed to enhance both safety and visual appeal These headlights are engineered to provide optimal visibility in various driving conditions while contributing to the vehicle's modern, sleek aesthetic
This guide breaks down the different types of headlights and lighting components.
Mazda 3 headlight bulb replacement Remove the front combination light In this tutorial i show you how to access and change the headlight bulb on a 2007 mazda 3. See how to change burnt out bulbs and more!
Driver and passenger side sold as pair product interchange Replacement headlight connector for h11 bulbs replace melted headlight connector for h11 bulbs car makers have made the mistake of under sizing the wiring for their headlights, causing the plastic electrical connector to melt To fix the problem, you'll need a replacement headlight connector. Hello, quick video on how to replace change remove install headlight bulbs in 2013 2014 2015 2016 2017 2018 mazda 3
The following instructions apply to the mazda 3 model years 2014, 2015, 2016, 2017, and 2018.
To replace the mazda 3 headlights proceed as follows 1) open the front hood 2) unscrew and remove the screws on the upper part of the bumper 3) unscrew the screws from both front wheel arches connected to the bumper
4) unscrew the screws of the underbody protection and remove the latter 5) disconnect any electrical connections on the bumper